
Aokiji 0 Stam Forest Speed Read Guide

Intro: Hardest island on Global. Not the same as Japanese version, so forget any information you know from that island. You will need G3. You will need at least 15 sockets in despair and 15 sockets in anti-lock and at LEAST level 3 Auto Heal (300Hp per turn). You will need at least a level 85(+/-14):
Momonga (Skill ups not important but help)
Doflamingo (Very close to max)
Aokiji (Skill ups not important but help)
Golden Pound Ussop (Max skill ups)
Whitebeards ship is optimal, but thousand sunny can also be used.
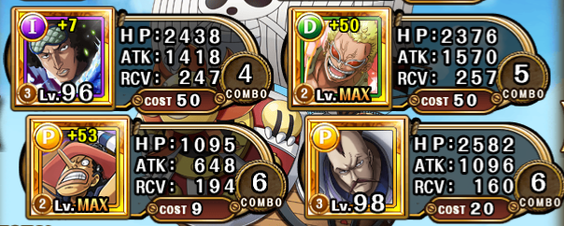
Prep: Arrange team like this:
Notes: Struggling? When attacking stuff in this island, regardless of where you are for the first 15 or so stages, try choosing three characters you're best at hitting perfects with. It is more costly to miss a chain of perfects than to deal a little bit less damage for the start of the island especially.
Friend Captain: Another G3 who helps you with lock and despair. If you're already set, auto heal and matching orb rate up are not going to hurt you.
The Fight
Stage 1-10: Save up specials. Sacrifice legends that aren't Boa to Coby in your mind for good orb luck.
Stage 11: GPU Special right after all the effects. Take out all the enemies, order is unimportant.
Stage 12: Defeat Tashigi in 1-2 turns with (GPU->G3->G3->Mom->Aokiji->Doffy). 2nd or 3rd turn, if you have good orbs Lock them with Aokiji, then defeat smoker with G3 at the end of the combo.
Stage 13: Use any special that you need except Doffy's, to take the marines down and Domino (who should be targeted by Aokiji), in numerical order. Save a dex orb before finishing this stage. Also, there is a GAME OVER trap, if Domino attacks below 20%
Stage 14: Start the stage by moving a dex orb onto mingo and moving any hindering orbs off with Doffamingo's special. Attack the lion first in the following order (GPU->G3->G3->Doffy->Mom->Aokiji). If your orbs were great this should kill all but one unit on this stage. Afterwards do what you can to kill the other unit (or two if you were unlucky). You can tank one hit from any of them. Use RCV orbs accordingly. Try to hold on to one matching orb for the next stage.
Stage 15: GPU Special right at the start.
Round 1-
No matching orbs: Pass the round by doing a tiny bit of damage with all your units to shuffle the orbs
1 or more matching orb(s) that are not on Usopp: Destroy one of the males ending your combo on the matching orb
Round 2 and on-
Destroy the male navy units as fast as you can, you won't have to worry about healing for awhile. If they attack you, consider your run a bust. End Tsuru last.
This is around the point where hitting only perfects is imperative to your runs survival
Stage 16:
Round 1-
Attack and kill (or get extremely close to killing) Helm by attacking in this order (GPU->G3->G3->Doffy->Mom), relocate your last attack to Garp, so that Aokiji gets a nice chunk out of him. Of note, if your orbs suck, let helm attack you, and focus on taking Garp out. Hopefully the orb gods smile upon you next round.
Round 2-
Attack and finish off Helm, and then attack Garp. Ideally, Garp should be dead or very close to dead by round 3.
Round 3-
Allow Coby to activate (if he has not already), and kill what is left in numerical order.
Stage 17: Chances are you'll be locked for the first turn, land some idle hits anywhere, shuffling away bad orbs or trying to get a good one on momonga who should not be locked. After that, your mission is to kill Aokiji using nothing or ONLY Doflamingo's special somewhere in the next two turns. When Aokiji is dead, land the following on Berry Good to clear the stage (if you at least have normal orbs) (GPU->G3->G3->Mom->Aokiji->Doffy). There is a GAME OVER trap here, if Berry Good gets to attack below 20% health.
Stage 18: Note: Some of these characters are so far off the screen it may make it weird to land perfects. I highly recommend paying especially attention to timing, or playing with the game sound on. Your visuals will be skewed. Also keep in the back of your mind you need about 9K health for stage 19.
Round 1-
You will probably be locked. Shuffle bad orbs, GPU Special.
Round 2-
Use BOTH G3 Specials. Target Boa, you will land four attacks on her, then switch your last two and hit Mihawk (GPU->Mom->Aokiji->Doffy->(switch)G3->G3).
Round 3-
You can use Momonga (IF his special is maxed) or your Doflamingo (If you saved it before) here if your orbs are especially crummy. You'll want to deal a sizeable amount of damage from here on out, and a little luck may be required (along with perfect execution). Target Mihawk for 4 hits then you will go to Boa for the 5th hit then Moria for the last hit. It will look like this: Use (GPU->Aokiji->G3->G3 (killing Mihawk)-> Doffy (killing or almost killing Boa)->(switch to Moria) Momonga).
Round 4-
Use this round to to finish off what you've already damaged. If you kill Moria early, land a g3 hit on Mingo.
Round 5-
End Mingo by finishing your damage chains with G3. It is likely that you will need some orb luck for this.
Round 6 and onwards-
Before you're ready to land the round that will kill Kuma, use Aokiji's special and especially look out for int orbs on Aokiji. If you've played right, hopefully that lock will at least include some good orbs, which you will probably need to carry on to stage 19. You can also chose to save Aokiji's special for the next stage if you had really bad orb luck.
Stage 19: This is the stage that will test to make sure you did not waste your health away. Simply target Sengoku, and kill him as fast as you can using no specials except for your carried Aokiji. Garp will attack you doing the same thing he does in his raid, so his first few hits should not end your game. If you are in a situation where you would overkill Sengoku, change your attack pattern so that damage is shared between Sengoku and Garp. One strategy that can help make this more fluid, is to attack four or five times Garp, and then use Aokiji alone against Sengoku. Beware although, because if you do not deal enough damage and Sengoku activates, that will be a game over.
After the Buddha is down, kill Garp (who needs to be 1-2 shotted depending on how fast you killed Sengoku)
Stage 20 (Boss stage): Note: Hardest part about this stage is the nerves, calm yourself down, I find washing my hands and eating some snacks will help a lot. Hungry=missing perfects.
Using no specials, bring Aokiji as close to 50% health as you can. You can let him attack you one time, since it will never kill you.
When as close to 50% as you can get, burst using all the specials you have (You should have by now Doffy and Mom specials ready as they are necessary) ending your perfect chain on Momonga boosted with his special.
And that's it! Have questions/comments or suggestions for the next guide? Leave them below! (do know that all the one piece guide chat rooms are combined) MORE GUIDES CAN BE FOUND HERE BY THE SAME AUTHOR.
